|
|
| FrontPage FAQs - How do I add a
form to my site? (page 2) |
|
Click
here if you missed page 1
Make It Easy on Yourself
The next thing you'll want to do before your form is
ready for action is to configure the fields you've
created. Why? Well, Front Page creates default
field names for the fields based on their type and
number. For instance, the first Textbox you created is
named T1. Makes sense. Until you get it the first
time in an email and you're trying to remember exactly what
questions T6 and R5 go with. So you need to go in and
change the field names to something more meaningful.
To set the properties for a field, single click on that field
to select it (little boxes will appear at it's corners) and
then right click. Select Form Field Properties on the
menu that appears. This will open a new small window
which allows you to set the properties for that field.
Each type of field has it's own properties so we'll go through
each one.
|
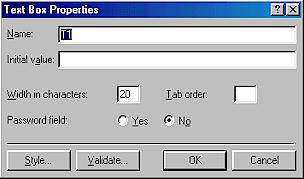
One-Line
Textbox - Change the name of the field to something more
meaningful. If you're asking for the person's
first name, use firstname or fname. If you're
asking for email address use email or email_addy.
As long as it's clear to the person receiving the
email.
-Width in characters is how large the box displays
onscreen and how much input it will accept. For
something like Street Address you may want to change
this to 60 or so. |
 |
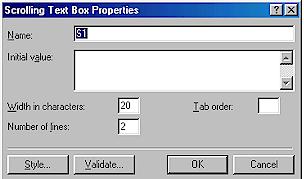
Scrolling
Textbox - Change the name to describe the field.
If you're asking your visitor to submit comments here
the name comment would be great.
-Width in characters is same as above.
-Number of lines is how high the box displays.
Keep in mind that the box will allow for scrolling, so 3
or 4 lines is usually fine. |
 |
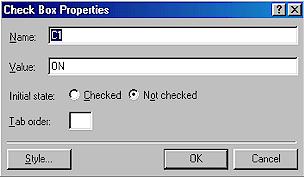
Checkbox -
Make the name meaningful.
-Value - The value will only be returned when the box is
checked. For clarity sake, you can use something
like YES instead of ON if you prefer.
-Initial State - This determines if the box is checked
by default when it appears. Generally it's best to
set the default to Not checked. That way you know
if it comes through checked the user did it and didn't
just forget to uncheck it. |
 |
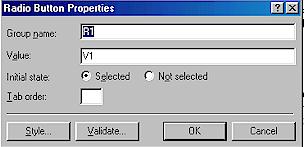
Radio Button -
Okay, radio buttons are interesting. With Radio
buttons you are dealing with a group and users are only
allowed to select one. So how does Front Page know
which Radio Buttons are part of the same group? By
Group name. An example is the best way to explain
this so here goes...
Let's say this was a part of your form:
You would click on the
first radio button, right click and select form field
properties. In the properties window, change the
Group name to age. Set the Value as 18-25.
Set Initial state to Not Selected. Click OK to
finish.
For the second radio button, get to the properties
window and set Group name to age again. Front Page
now knows that radio button 1 and radio button 2 are
both part of the same group...age. Set the
Value for button 2 to 26-45. Set Initial state to
Not Selected. Click OK to finish. Continue this way for all the buttons that are part of
the Group age. |
 |
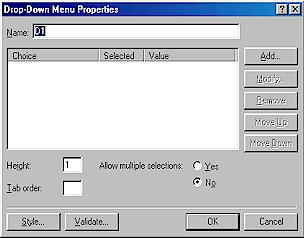
Drop Down Menu
- Drop down menus are also a little different. To
set their properties you need to designate what the
items in the list will be.
-First, name the field something meaningful.
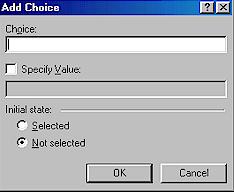
-Then click the Add button. This will open a
second window called Add Choice. In the Add
Choice window under Choice type what you would like to
appear for one option a user can select. You also
have the ability to specify what a different value to
appear in your email. Why would you want to do
that? Let's do the example thing again.
This is a real life example from a site I once
did. I needed to have users pick the airport they
would be flying in from. For the choice, I used
the three letter airport code and the airport name, in
case the user didn't recognize or know the airport by
code. I then checked the Specify Value box and
under it typed only the airport code since my client was
familiar with these codes and used them in software they
had in their office. So, for one of the options on
my drop down menu:
Choice: (IAH) George Bush Intercontinental Airport
(Check Specify Value)
IAH
When you're finished setting up this choice click OK and
you will be returned to the Drop-Down Menu Properties
window and your choice will now be listed there.
Continue adding choices until you have created your
entire list.
If you want users to be able to pick more than one
option from the list check Yes next to Allow multiple
selections. When finished, click OK |
 |
And at
the Finish Line
You're almost
done, I promise. The last step is to setup where
your form goes and other little details. You do
this by hovering your cursor inside the form outline and
right clicking, then select Form Properties (not Form
Field Properties) from the menu. That gives you
this window.
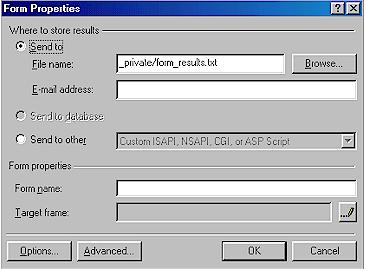
Don't get frisky, this isn't the really important
one. Here, at E-mail address type the email
address you want your form results to come to.
Then skip down to where it says Form name. Give
your form a name...you wouldn't want it having to answer
to "Hey, YOU" would ya. Okay, bad joke,
but at this point you could probably use it.
Technically you could stop there. But there really
are a few more things you need to set for your form to
work well. So.....
Awwww,
put your eyes back in, it's not that bad.
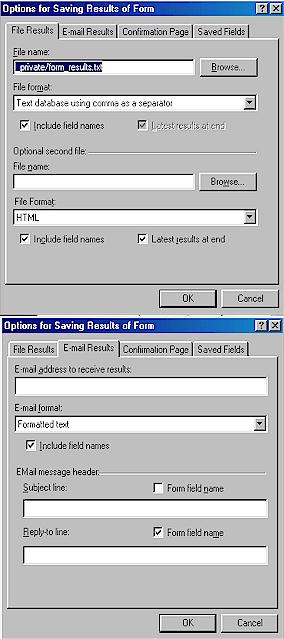
Ready? You get here by clicking on Options
at the bottom of the Form Properties window.
You get this window with 4 tabs. File
Results is usually on top.
On the File Results tab you may not have to change
anything. But say, for example, that you
have more than one form running on your
site. In that case you may want to change
the filename that the results report to.
Make sure you keep the file reporting into the
_private directory to keep your results safe from
prying eyes.
Example: You create a second form for your site
where people choose their favorite TV show.
You may want to change the File name at the top of
this page to _private/fav_tv.txt
When you're finished with the File Results tab,
click on the E-mail Results tab to bring that to
the front. Here's the good stuff.
E-mail address to receive results: This is
the email address where you want the results sent.
E-Mail format: Leave this alone
EMail message header:
Subject line: This is what you want to
appear in the subject line of the emails you
receive. Make it something that will catch
your attention and be meaningful.
Reply-to line: This is important because
this sets what appears in your email as Reply
to. A form is processed on the server before
being sent out, so by default it appears to come
from the server. That means that if you
click Reply to for the email when you receive it
you will just reply to the server and it's not a
great conversationalist. Front Page gives
you the option to put information collected in one
of the fields of the form into the Reply to
line. Make sure the checkbox next to Form
field name and then type the name of the form
field into the box below Reply-to line. For
example, if you have a field called email_addy
where you ask users to enter their email address
you would type email_addy on this line. |
 |
Last, but certainly not
least you want to click on the tab for Confirmation Page
to bring that page to the top. This is optional,
but recommended. After a users submits a form they
are redirected to a confirmation page. Front Page
has a very bland default confirmation page in place, but
we recommend making your own. Doesn't have to be
fancy, but at the least you might want to thank your
visitor for submitting their information and provide
them with links back to the main parts of your
site. Now you probably don't have a created
confirmation page sitting around, so you can either open
a new page, create your confirmation page and save it
and then come back here and browse to enter it in URL or
you can save this form page as is, close it, create your
confirmation page and save it, then reopen the form page
and come back to these options to designate the
confirmation page.
And
There You Have It, Folks!
That's it. I know, that was enough, wasn't
it. But you are now the proud parent of a fully
functioning form for your site.
|
|
|
