Privacy Seal 5

Web Hosting Power Pack Starting @ $6.95
No Setup Fee ($30 value)  $11.50 for your own .com (save 40%)


Control Panel Tutorial - Page 2

How do I?
Access The Control Panel     Change Control Panel Password    Change FTP Password    
Add or Manage Mailboxes, Mail Forwards, and Mail Groups
         

4)Changing your FTP login password:

In your Domain Administration screen click on Hosting (see in figure 3 above)  This will take you to the Hosting Settings screen.

Enter your new password on the FTP Password line (seeat left).  When finished click Update ( at left).  When update is complete click Up Level to return to the previous screen.
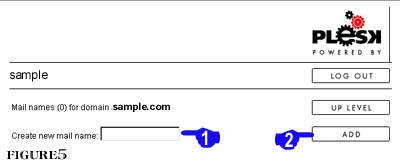
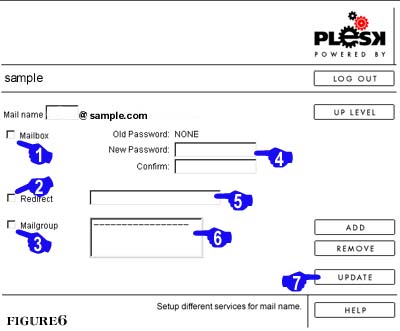
5) Create or Manage Mailboxes, Mail Forward, and Mail Groups:  Start from the Domain Administration screen (figure 3 above).  Click on the Mailboxes button (see in figure 3).  You will be taken to the Mailbox Administration screen (figure 5 below)


Enter the name of the new mailbox. (see in figure 5 at left).  The mail name is the user part of the email address.  ex. If you were setting up an email address for "sales@sample.com" the Mail User would be "sales".  After you have typed in the Mail User click the Add button ( at left).  


You will be taken to the next screen (Figure6 at left) and your newly added mail user will now appear in the mail name box at the top of the screen.  You now need to designate what type of mail user you are adding.  
--To add a full mailbox which can be setup in Email software like Outlook Express or can be accessed through our Web Mail screen, check Mailbox ( at left).  After checking the box next to Mailbox, type in the password for this mailbox and retype the same password in the confirm box directly below it. ( at left).  Click Update to add this mailbox.(at left).

--To add a mail forward which sends the mail directly to another account you already have (ex.forward sales@sample.com to bob@aol.com) check Redirect (at left).  After checking the box next to Redirect, type the mail address the mail should be sent to in the box next to it. (at left).  The redirect address is the complete mail address this user's mail should be forwarded to.  (Note: Even if you are forwarding to another mailbox on this domain you still need to enter the entire email address.)

--To create a mail group for this mail user check Mail group ( at left).  A mail group is basically a group forward.  You set the mail group user and then select the addresses this mail should be forwarded out to. ( ex. You want to set up an address to send price updates to all members of your sales force.  You might set the mail group user to salesupdate.  You would then add the email addresses for each sales rep to the group.  Once complete, sending a mail to salesupdate@sample.com would send the mail to all of the sales reps in the group.)  After checking the box next to Mailgroup, click ADD.  A pop-up box will ask you to either type in an external mail recipient address or select a mailbox address which already exists on your domain to add to the group.  Then click the Add button in the pop-up box and your selection will be added to the group and will appear in the group window (at left)

When you are finished click Up Level to return to the main mail screen.


Back to top