Control Panel Tutorial
This tutorial is designed to provide you with step-by-step
instructions for using the new client control panel. Please feel free to
print the tutorial out for handy reference or open your control panel in
a second browser window and use the tutorial to step you through
using your control panel. Or use one of the hyperlinks below to jump to
a specific question.
How do I?
Access the control panel
Change Control Panel
password Change
FTP Password
Add
or Manage Mailboxes, Mail Forwards, and Mail Groups
1) Accessing your control panel: |
Access your control panel by clicking
here. On the left menu click the Control Panel option.
Enter your domain name and click Get Control Panel. This will take you to the login
screen. Type your login ID and password in the boxes and click Log
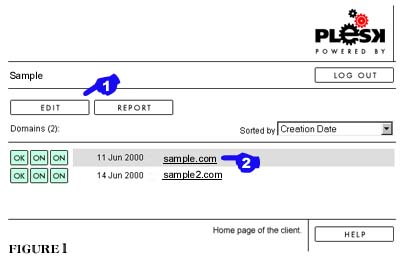
In. After clicking Log In you will be taken to
the Main Administration screen shown in figure 1 below.
|
|
2)Changing your control panel password: |
 |
Under this control system you
have separate passwords for your control panel login and your website
login. By default, when you open your account they are set the
same. We recommend that for ease of use and remembrance you leave
them the same. However, we recognize that for some of you there
may be situations where you want to have different passwords set.
To change your control panel password, after you log in, click on the
Edit button. (see  in figure 1 to
the left) in figure 1 to
the left) |
|
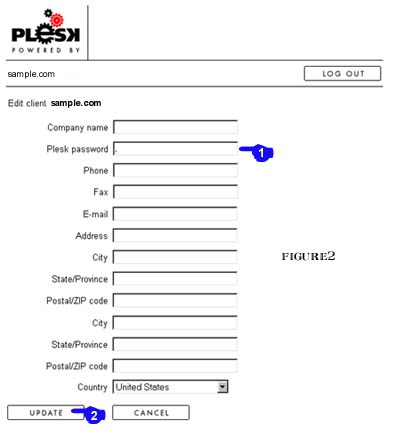 |
After clicking
the edit button you will be taken to Client Administration screen at the
left (figure 2). You can change your control panel password by
typing the new password in the Plesk password line. (see
in figure 2 to the left) It is also important to make sure that the
email address listed is a current and valid email address. This
email address will be used to send you information regarding your
account (these addresses are for our use only, they are not given out or
sold to anyone). Once you have completed all changes, click the Update
button (see  in figure 2 to the
left). When the update is completed you will be returned to the
Main Administration screen as shown in figure 1. in figure 2 to the
left). When the update is completed you will be returned to the
Main Administration screen as shown in figure 1. |
|
|
3)Manage your
domain
|
|
From your Main Administration
screen, click on the domain hyperlink (see
in figure 1 to the left) to proceed to the Domain Administration
screen. |
|
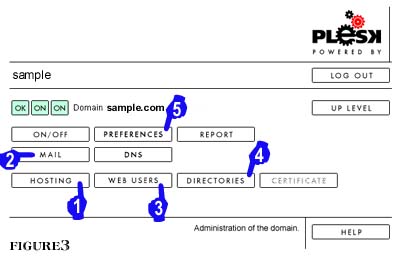 |
Welcome to your Domain
Administration screen! (see figure 3 at left) This screen is
the heart of your domain control. In this screen you can:
--Change FTP Password
--Add, Remove, or Edit Mailboxes, Mail Forwards and Mail Groups
--Create or Manage Web Users
--Create password protected directories within your domain
--Set preferences for your domain including catch-all email boxes.
Let's go through it step by step. |
|
Next
Page
|